
Best Hawks Builds — Scoundrel Assist Engine and All 8 Class Directions
Build Hawks around Fearless Leader and the job your squad is missing. Compare all eight classes and weapon choices.

For a strong starting answer, use Scoundrel Hawks as an assist-and-critical setup engine. Fearless Leader improves assist damage for the whole squad, while Scoundrel creates assist windows and guaranteed critical-hit openings.
Hawks can change class and later add another Specialization, so use the starting build to cover the job your squad needs now rather than chasing one permanent meta answer.
Eight-class decision table
| What the squad lacks | Hawks class | Weapon direction | Key reason |
|---|---|---|---|
| Assist and critical setup | Scoundrel | Rifle or Pistol | Easy Mark enables an assist; Identify Weakness guarantees the next damaging critical |
| Advantage and Spotted support | Scout | Pistol | Combat Recon generates Advantage; blaster damage applies Spotted; Pistol shots cost 1 AP |
| Mobile pressure | Assault | Rifle or Pistol | Bull Rush displaces; Sweeping Salvo damages and Disorients a cone |
| Multi-attack tempo | Gunslinger | Pistol or Repeater | Quick Draw can refund 1 AP on an elimination; Open Fire attacks twice |
| Threat control | Heavy | Repeater | Bulwark area-Taunts; Unstoppable grants two Retaliations |
| Recovery and buffs | Medic | Rifle or Pistol | Combat Stim buffs an ally; Morale Boost restores Health over turns |
| Long-lane accuracy | Sharpshooter | Longarm | Precision Shot always hits; Zero In improves hit and critical chance if position holds |
| Direct explosive plan | Soldier | Rifle | Rocket Strike supplies area damage; Brutal Strike Dazes once per enemy per battle |
Open the Hawks Build Planner to switch between all eight directions and campaign-risk settings.
Build A — Scoundrel Hawks
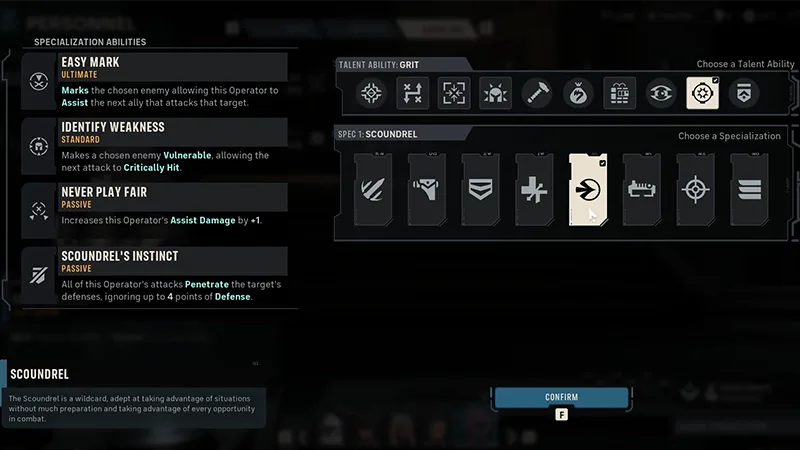
Turn job: create the reliable follow-up; do not force Hawks to be the finisher.
- Pick the enemy that must die this turn.
- Use Identify Weakness to apply Vulnerable.
- Follow with the squad’s hardest appropriate attack.
- Use Easy Mark when an assist converts another ally’s action into free damage.
- Let Fearless Leader improve the assist engine while Hawks remains present.
Why it fits: Never Play Fair improves Scoundrel assist damage, Scoundrel’s Instinct adds Defense Penetration, and Fearless Leader improves assist damage across the squad.
Weapon: start with Rifle for a flexible 1 AP opening shot and medium range, or Pistol when several low-cost actions matter more than one hit. Do not choose Longarm only because it has the largest critical bonus; 2 AP shots can make the setup turn awkward.
Build B — Scout Hawks
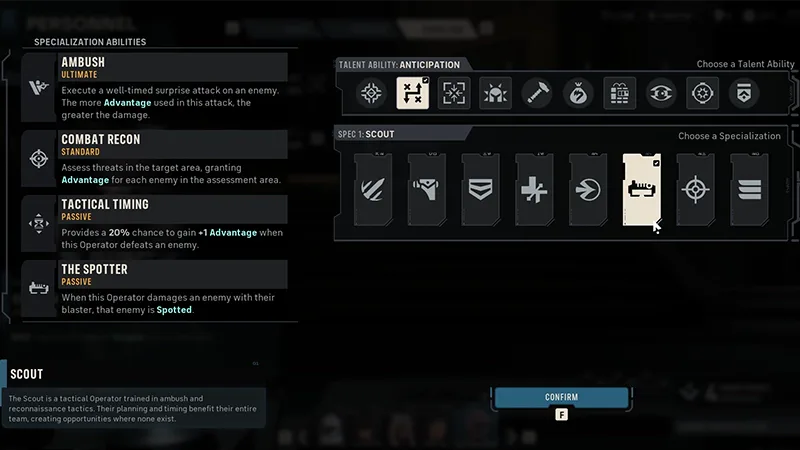
Scout is a tactical alternative when the squad needs Advantage and hit reliability more than another damage class.
- Combat Recon grants Advantage for each detected enemy.
- The Spotter makes blaster-damaged enemies ignore normal range and smoke hit penalties.
- Ambush converts more spent Advantage into more damage.
- A Blaster Pistol can fire up to three 1 AP shots in a normal 3 AP turn, giving more opportunities to apply Spotted.
Scout is not automatically best early. Its value rises when hit penalties, smoke, or expensive squad actions actually create a bottleneck.
Focus order
Use a needs-based order:
- the active ability that defines the build;
- the passive that makes the squad interaction work;
- reliability or survival needed by the current difficulty;
- conditional burst only after the loop is dependable.
Exact Focus Tree node names, percentages, ranges, and point costs are not listed here yet. Plan the job first, then check the current in-game tree before committing the last points.
Weapon breakpoints
| Weapon | Damage | Crit bonus | Range | AP pattern | Hawks use |
|---|---|---|---|---|---|
| Blaster Pistol | 6 | +4 | Short | 1 AP per shot | More actions for Scout or mobile turns |
| Blaster Rifle | 10 | +6 | Medium | First shot 1 AP; later shots 2 AP | Safe generalist opener |
| Repeater | 8 | +4 | Medium | Damage scales with AP committed | Dedicated stationary damage turn |
| Longarm Blaster | 12 | +12 | Long | 2 AP per shot | Long-lane precision role |